“Pirate’s Gold” Production

After having the layouts, the designs, and the storyboard, It was time for me to move on to the production of my project, the “Pirate’s Gold.” During the production, my first goal was to model the chest to the way I want it to be.

Screenshot (3).png

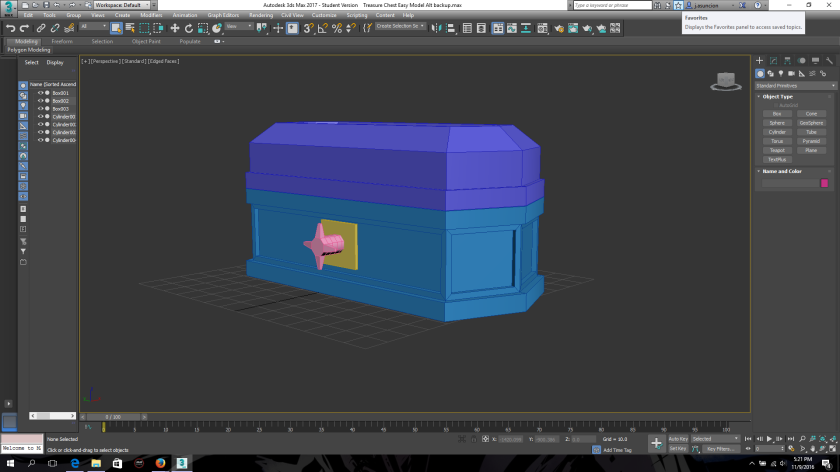
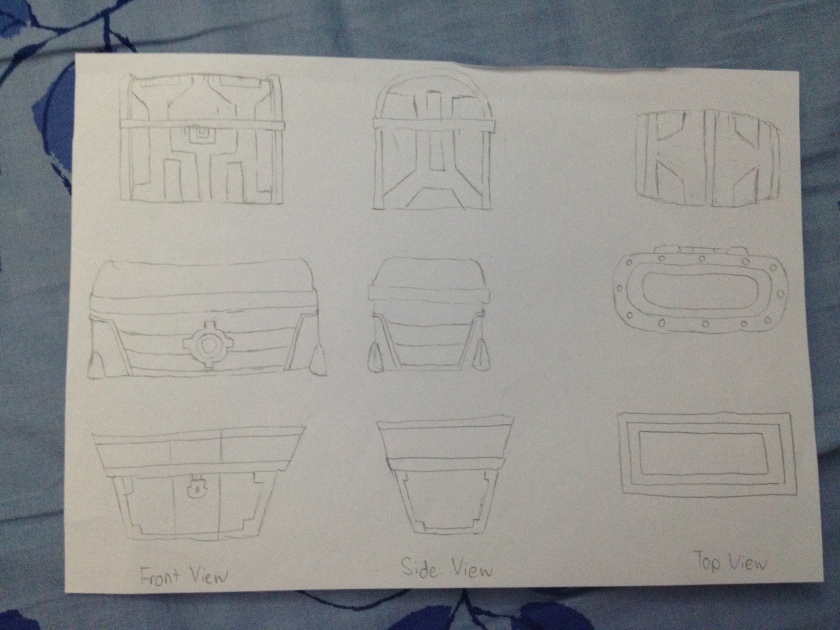
I just added a box and resized it to make it look big and rectangular. That box was made as a base of the treasure chest. I made the left and right side of the chest triangular and made some lines around the chest for the selected planes to be extruded. I added another box and made it as a lid of the treasure chest. I made the lid smaller than the base and beveled it to make it look like a cubed trapezoid. I then inset the top of the lid to add space for the planes and extruded the center down to give it more depth. I adjusted the model and link the two boxes to make it as a complete treasure box. I soon then added a handle in front of the chest and also modelled an eight-sided cylinder that acts as the hinge of the chest’s lid.

Screenshot (6).png

After modeling the treasure chest, I selected the model and Unwrapped the UVW of the treasure chest. Unwrapping the UVW of the treasure chest will flatten the model into 2D and it will also help me add textures to the flatten planes. I assemble the Unwraps of the treasure chest within the box in order for the textures to be shown when used.

Screenshot (7).png

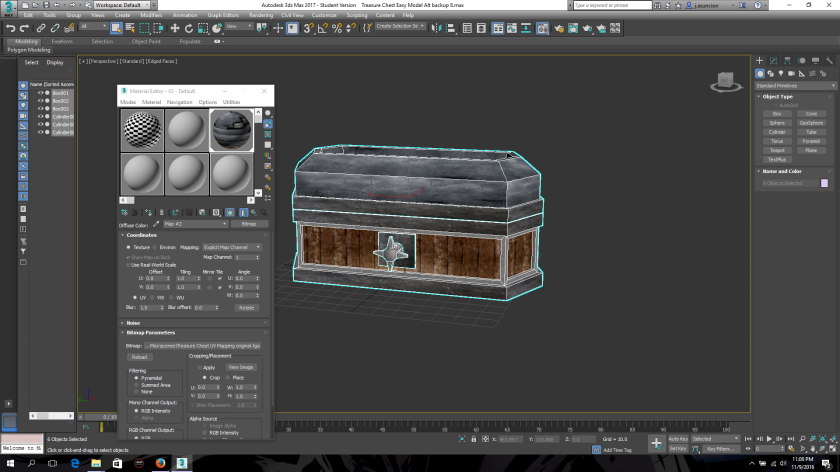
I edit and place the textures in the software called Photoshop. Photoshop allows me to edit and design images for graphic designing or other purposes. Texturing allows me to control the colors, reflectivity, and the shininess. I use the wood and metal textures from the internet as texture materials for my treasure chest. I cropped the textures and place them into the UV maps with its proper shape. I added a bumpmap or shaders to make the textures have a more decorative look. I also included specular texture to show the model’s shininess.

screenshot-8

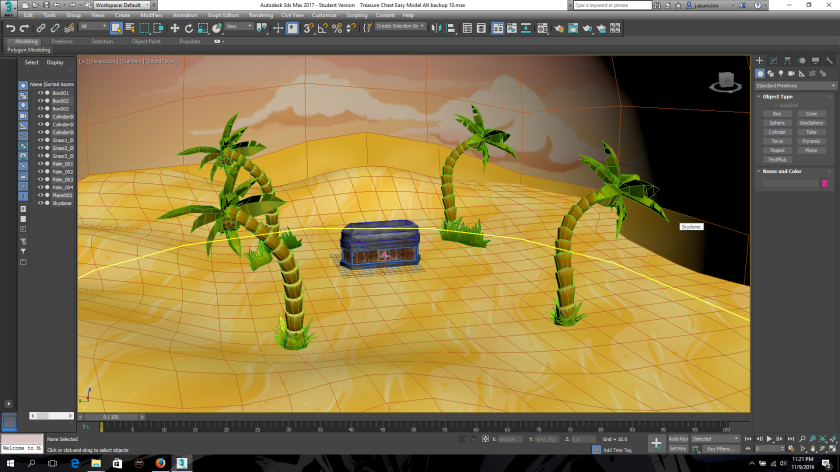
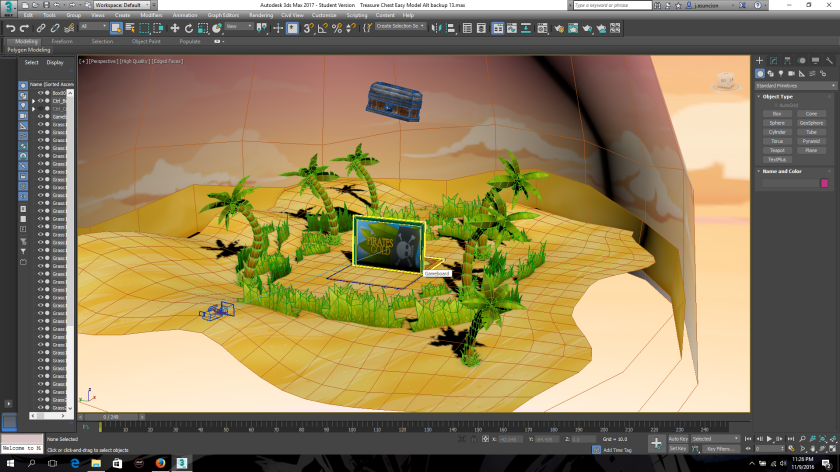
         After having the UV maps prepared with its textures, I save it as targa and used it as materials for the chest. Then I started adding the environments from the assets that were given to me for this project, which helped make my job a lot easier. I added in the environment a skydome that acted as the sky. Then I added palm trees, grass, crabs, coins, and a board as props for the animation. I also added textures to them from the assets, which made the environment complete.

screenshot-10


After processing the textures into the models, I rig some models to be put into action and be animated. I rig the chest’s lid to open; rig the crabs to move, and rig the camera to move as well. By inserting the camera, it will allow me to make the right angles and shots according to my storyboard. After having the rigging done in most objects, it was time to render it and move into the post-production.       

“Pirate’s Gold” Pre-Production

Last week, I was given an assignment to work on a 3D animated project codenamed the “Pirate’s Gold.” As I have learned through the weeks of college, I know that it is important to know the production pipeline. First off, I started my project by initiating the pre-production. I came up with the plans and started putting them into scratch.


My first goal was to come up with a design for the treasure chest and use it with a layout for the scripted commercial. In doing so, I first made a simple design of my treasure chest that was inspired from the chest design from a popular video game series known as “Borderlands.”

Borderlands chest.png

The chest is long and different from all the other treasure chests. It almost looks like a coffin, but it includes with a handle. The top lid is not round, but almost rectangular. The left and right sides of the treasure chest is triangular because I wanted it to be different from other chests.

IMG_4035.JPG


After making the design of the treasure chest, I had to think of the layouts for the storyboard, see where the camera should be pointing at, and how the chest should be positioned and reenacted. The environment for this project will be set in an island filled with sand, grass, and palm trees. There will also be some crabs that will be part of the animation. The camera jumps over the grass to look at the sign, and then looks up as the treasure chest falls. The camera moves around and focuses on the treasure chest while the chest occasionally shakes. The camera stops in front of the chest and zooms in. The camera immediately zooms out when the chest jumps and opens. The chest then slowly lands and sprays out gold coins.

img_4034


Moving Forward

Even though as a student taking upon the animation course, I have to also take upon the subject of “Critical Thinking in Creative Media (CIU110).” In this unit, the subject helps students expand their skills of thinking critically as well as analyzing and improving their self-reflective learning. This unit also helps students understand and be aware of the academic purpose of education through personal, societal, and professional viewpoint.

project-help

As a student, I ask myself on how I can be able to successfully complete this unit. Well first off, I can successfully complete CIU110 unit by following the home works and the assignments that’s been given to me. Every time I follow the assignments, it will help me improve and learn more of the topics discussed during class. In fact, homework is really effective for many students. It can help me understand the topic discussed during class, and it can help me practice over it. Of course, turning in the assignments at the right time will help me improve my grade (as well as my time management). This gives off the benefit of being able to understand the mistakes that I make and how I can be able to correct them to get better grades.

a-business-lecture-at-the-007

Of course, I have to listen to every lecture during class. Listening to everything that your lecturer will say will definitely help me pass CIU110; however, I must be willing to learn and listen because if i don’t, I will have a bad time. Dennis G. Jerz showed the tips from one of her students claiming that, “Approaching lectures with a positive attitude allows one to be open-minded and enables you to get the most out of the information presented. Make a conscious effort to pay attention. Concentrate on concentrating” (Jerz, 2001).So if we don’t listen, then we will not learn and we will miss critical or decisive information for future purposes.

Even if I try to successfully complete CIU110, how will this subject help me achieve my goals in the future? According to the website that I’ve recently researched, Monica Fuglei said that Glenda Faye Pryor Johnson, a Memphis parent writer, identified four qualities that children develop whenever they finish their homework: responsibility, time management, perseverance, and self-esteem. These four qualities help students become high-achievers (Fuglei, 2016). So whenever I accomplish my assignments in CIU110, I not only learn, but I also develop my effort into learning the subject. That way, I can be able to develop my learning skills and my critical thinking skills for future use (either for story-telling or for educational purposes).

timthumb


References:

My Strengths and Weaknesses as a Learner

Upon taking the animation course as a learner, I have a couple of strengths and weaknesses. My general strength as a learner is that I am capable of memorizing or understanding the lectures or other things that’s written before me (visual learning).

memorizing.jpg

In fact; whenever I write down for my speech, I look at the words and remember or even memorize them. Memorizing is actually a helpful way of remembering (“In praise of memorization: 10 proven brain benefits,” 2012). I think of ways to express the words for my upcoming speech, so once I get the words right, I enthusiastically express the words and stay confident in front of my audience.

o-hand-drawing-facebook

My other strength as a learner is a bit of drawing. Whenever I draw though, I am able to draw and copy from any picture that I see. I can be able to look at the lines and see how they are positioned. I usually copy and draw cartoon characters or places since they are easy to draw and not hard to depict.

Listening

My weakness as a learner, however, is not being able to listen to every lecture or instruction given to me (auditory learning). I do listen to instructions, but my problem is not being able to listen to some vital parts. I follow most of the instructions, but forget some things that can be important. The reason why I’m not really good at listening is because I can easily be distracted or sidetracked by my own thoughts (which can be triggered from the one thing that the speaker said). That is when I usually lose track of the lecture during class.

My other weakness is being slow at the things that I do. For example, I am slow when it comes to thinking critically as well as thinking something creative. Speaking of creative, I usually have a hard time thinking of creative things when it comes to storytelling and drawing. I take time to think or brainstorm my own work.

In order to improve my listening, I need to clear my mind, relax, and avoid unnecessary interruptions (“Listening skills – the 10 principles of listening,” 2011), so I can be able to focus well upon the lectures. I also wish to read more books to improve my comprehension as well improving my creativity. I want to improve my drawing skills by taking drawing classes that will help me know the right techniques.

Whenever I’m learning, I can’t always rely on my basic knowledge. If I want to learn more, I can always look into my campus’ library and use their resources especially ebrary. Ebrary is one of the things that my campus uses for resources. It provides a digital library with tons of e-books. The search engine in the ebrary also allows to search up words or phrases that can be useful to include for the upcoming research. This is only when I need to gain more knowledge for any future works.

References:

What Type of Learner Am I?

From all the things that I study or do, I asked myself, what kind of learner am I? There are three general types of learning: Auditory learning, visual learning, and tactile learning.

digitalchalk-auditory-learning-700x465

An auditory learner is someone who takes in information or knowledge by listening or hearing things to enhance his or her understanding. An auditory learner remembers what he or she hears or says, remembers oral instructions well, and  understands any information he or she can hear (“Auditory Learner,” 2014). According to the website that I’ve taken, it says that I am fifteen percent auditory learner (“What’s your learning style? 20 questions,” 2011). That is actually true because I am quite forgetful after listening to the instructions. Whenever my parents instruct me to do something, I only listen to most instructions sometimes because whenever I do something, a vital part of instruction slips out of my mind, so I forget easily.

2

The website also told me that I am forty-five percent visual learner (“What’s your learning style? 20 questions,” 2011). The website I researched says that visual learners “prefer using images, pictures, colors, and maps to organize information and communicate with others” (“The visual (spatial) learning style,” n.d.). Basically, visual learners remember or understand things when they see it. I definitely agree that I am mostly a visual learner because during my school time, I remember the lessons or the subjects whenever my teacher writes it down on the board. Just by looking at the information that my teacher covered, I keep the information in my mind and remember it very well. I also remember scenes from movies whenever I see something that makes an impact.

ed00136_

Finally, the website I took the test from says that I am forty percent tactile learner. A tactile learner is a person who learns, remembers, or understands by interacting or experiencing things that are new (Fleming, 2016). In other words, a tactile learner learns or understands by doing things that they didn’t do before. For example, as a tactile learner, I learn to play video games not through the instruction manual, but trying to play the game itself. I would press on every button of the controller to see how each functions. By discovering and experiencing the functions of the game, I was able to learn.

References:

The History of 3D Graphics

Over these past years, technology improved tremendously especially with animation as 3D graphics continue to improve. Long time ago, the making of 3D models were all crooked and stiff, and the animators weren’t able to improve or design what they desire due to the limitation of  3D modeling.

As time progressed, the new and improved 3D animated movie such as Toy Story in 1995 was released that time by Pixar, and soon the movie became a world phenomenal hit. It was the world’s first feature-length computer-animated film (Zorthian, 2015). Toy story has wonderful characters along with the designs of a proper 3D character. Because of Toy Story, marketing expanded and Pixar continued to make more 3D animated films. Pixar continues to become successful as the animators help develop a continuous series of 3D movies.


pixarlogo

Image: http://vignette2.wikia.nocookie.net/pixar/images/d/d0/Pixarlogo.jpg/revision/latest?cb=20100712043022

One of the animations that shook me and inspired me was Pixar’s first mature film called “Borrowed Time,” made by the animators, Lou Hamou-Lhadji and Andrew Coats. The story talked about a sheriff who was facing a state of regret due to the accident that he made towards his father (Makuch, 2016). The animation took a surprising dark turn when it revealed the true accident. I’m even surprised that Pixar would allow such film to exist, of course, it’s only a side project.

untitled.png

Image: https://static.independent.co.uk/s3fs-public/styles/article_large/public/thumbnails/image/2016/10/18/12/borrowed-time.jpg

What I really also love is how the animators finally have the chance to show their creativity and create scenes that may even be impossible to perform in real life. I hope there will be more surprises as animations advance and improve.


References

  1. Makuch, E. (2016, October 19). Watch the Devastating New Short Film From Pixar Animators. Retrieved October 19, 2016, from Gamespot, http://www.gamespot.com/articles/watch-the-devastating-new-short-film-from-pixar-an/1100-6444594/
  2. Schirmer, S. (2016, August 19). Thirty years of Pixar: From toy story to finding Dory, the studio’s biggest hits. The Guardian. Retrieved from https://www.theguardian.com/film/datablog/2016/aug/19/thirty-years-of-pixar-from-toy-story-to-finding-dory-the-studios-biggest-hits
  3. Zorthian, J. (2015, November 19). How “toy story” changed movie history. Retrieved October 17, 2016, from TIME, http://time.com/4118006/20-years-toy-story-pixar/


My Working Space

When I think about my working space, I want a place where I can be very comfortable to work at. For example, I want to work or study in my room alone while listening to my music. The music I listen to for studying is not lyrical music, but usually background music whether instrumental or the beats of the sound. If I listen to lyrical music while studying, I can be distracted easily by the words or the lyrics the singers use. In fact, Leo Fuchigami said that, “Bad study music includes rap, pop, country and other genres that have clear vocals, because listening to human speech automatically interferes with the language processing part of your brain, which is important for most kinds of studying. Good study music uses synthetic, instrumental or natural sounds to help maintain your energy-level, without including distracting human speech” (Fuchigami, n.d.). When I work instead of studying, it doesn’t require me to concentrate that much so I usually listen to lyrical or non-lyrical music. I prefer fast and aggressive kind of music when I work because it gives me a motivating and aggressive mood to work. When I study, I listen to music that’s calm or tranquil. When I study or work in my room, for example, I will work with a normal table instead of my bed because whenever I use the bed, I tend to get comfortable and be very much relaxed to the point that I may accidently fall asleep and waste my precious time and moments of my work. I also prefer working in my room alone because I tend to be distracted by other people’s presence. It gives me the least distracting environment if I keep the others out (“Strategies for effective learning,” n.d.). If there are some things that I will like to improve in my work space, I will like to organize my room as well as my table to make it look cleaner and have more comfortable space for me to work in.

img_3964

img_3963

Just by looking at the table, you can see that it looks nice, clean, and comfortable to work in.

Mentally, I will like to take small breaks during my work so that I can rest, relax, and regain my focus before I continue my work and staying on schedule (Korkki, 2015).


References:

3D Production Pipeline: Lighting, Rendering, & Compositing

While 3D modelling (especially in 3DS max), I learn that people have the ability to control the light whatever and wherever they want. People can set the light like the sun and see how much light or glow is required for their scene (Boudon, 2013). With a proper light adjustment, the scene will then look realistic and alive (“The process of 3D animation,” n.d.). Lighting in 3D modeling act as a simulator to see how lighting works in real life. The set up for the light is usually in three points (or more). The three-point lighting is a standard technique that was generally used for cinematography and photography. The three-points are key light, fill light, and back/rim light. Key light is the light that shines the brightest upon the model. The fill light reduces or lowers the deep shadows cast by the key light and it should be on the opposite of the key light’s position. Rim or back light adds a little glow on the back or top of the 3D model to make it more realistic because if not, then the shadows will envelope around the model, and it will look bad.  It’s approach is to properly light up the model in a compelling way and make it look almost simple, but also nice to see. The three-point lighting is really useful in illuminating the model as a studio type lighting effect (Masters, 2014).

mtbl_3point_2.jpg
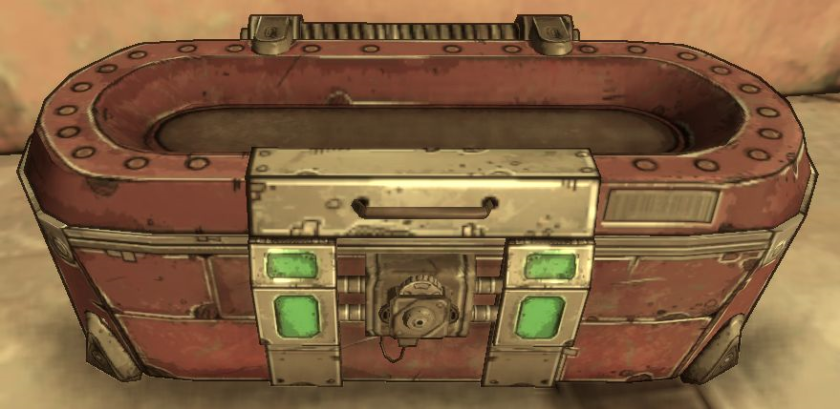
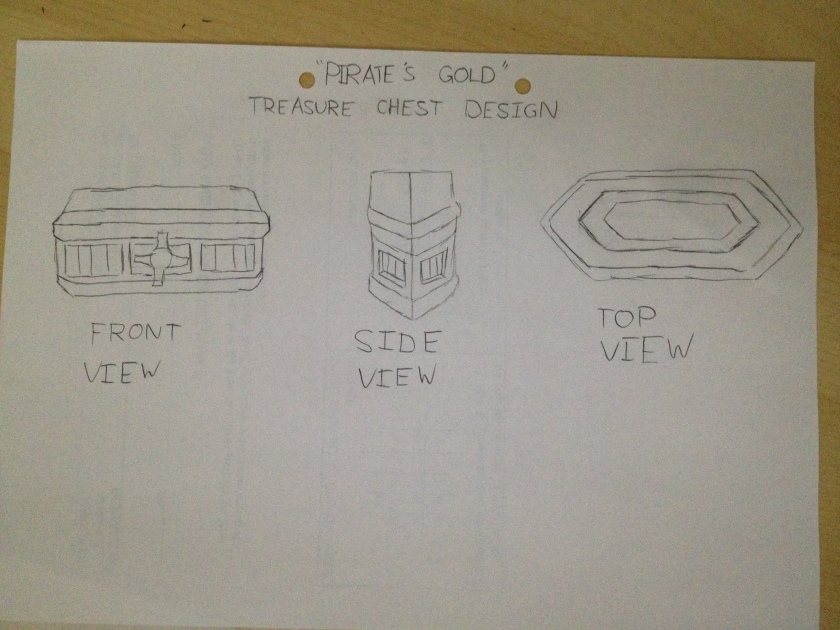
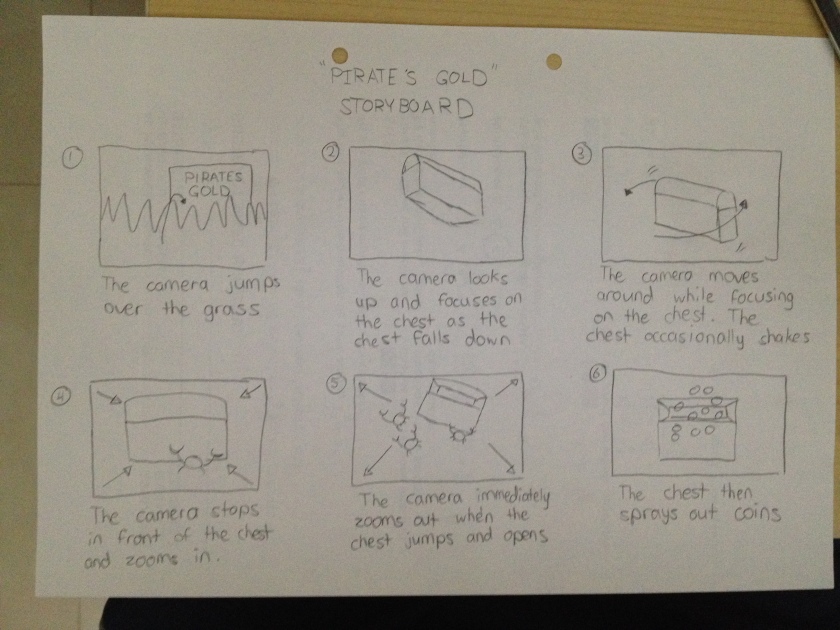
Image:  http://www.marmoset.co/wp-content/uploads/mtbl_3point_2.jpg
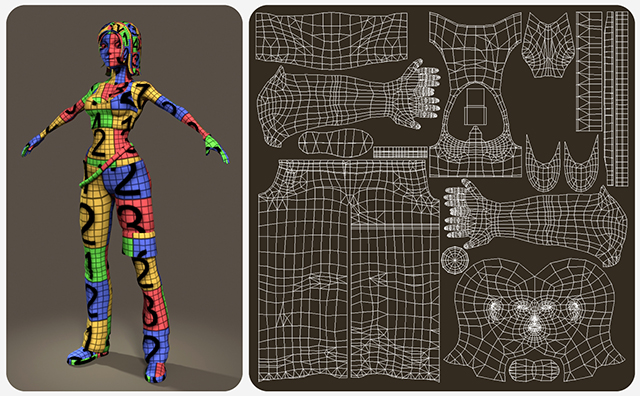
After lighting the 3D models’ surfaces, rendering takes place as it is the last step in 3D modeling and animation. Rendering is a process when a 3D animation is assembling the data or output files, and its animated action scenes to make it into a viewable result when exported. (Sanders, 2015). Before exporting the animated project, the scenes must be checked to see if there’s any feature that needs to be adjusted such as the lighting effect, the camera shots, or the environment till you get what you desire your project to be (Boudon, 2013).

7a39acb0643f10e2a820f014dc8de265


.Image: http://cdn.mos.cms.futurecdn.net/7a39acb0643f10e2a820f014dc8de265.jpg

Once the renders are finalized and exported, the rendered images will be brought to compositing programs to be edited and be finalized into a film. Compositing is usually processed by adjusting the light to form the final scene and by rotoscoping (Gulati, 2010), which is a process when 3D animation imitates a live action video. For example, an actor performs some actions scenes while the animator creates a digital character that mimics the actor’s performance.


compositing2.png

Image: https://movingthingsandsound.files.wordpress.com/2011/08/compositing2.png


References:

    1. Gulati, P. (2010, June 9). Step-by-step: How to make an animated movie. Retrieved October 20, 2016, from envatotuts+, https://cgi.tutsplus.com/articles/step-by-step-how-to-make-an-animated-movie–cg-3257
    2. Gulati, P. (2010, June 9). Step-by-step: How to make an animated movie. Retrieved October 20, 2016, from envatotuts+, https://cgi.tutsplus.com/articles/step-by-step-how-to-make-an-animated-movie–cg-3257
    3. Masters, M. (2014, January 26). Understanding Three-Point lighting | key light, fill light, rim light. Retrieved October 17, 2016, from Pluralsight, http://blog.digitaltutors.com/understanding-three-point-lighting/
    4. Sanders, A.-L. (2015, August 28). In Computer animation, what is rendering? Retrieved October 17, 2016, from Tech, http://animation.about.com/od/faqs/f/In-Computer-Animation-What-Is-Rendering.htm
    5. The process of 3D animation. Retrieved October 17, 2016, from mediafreaks, http://media-freaks.com/the-process-of-3d-animation/
    6. Willet, N., Lee, I., & Castaneda, O. (2011, March 29). Animation production pipeline. Retrieved October 17, 2016, from PhysBAM, http://physbam.stanford.edu/cs448x/old/Animation_Production_Pipeline_(2d)_Nora_Willett.html

3D Production Pipeline: UV Mapping, Texturing and Shading, Rigging, & Animation

During the time of making a proper animated project, it is important to know these following things in order to continue through the stages of a 3D production pipeline. UV mapping is when the surface of a 3D model is turned and flattened into a 2D model in order to add or apply texturing. UV is turned into 2D because Luke Jarret said that, “UV is actually the co-ordinates that indicate the axes in 2D space which determines the placement of the images on a 3D object” (Jarret, 2015). The letters U and V show that they are the two geometry co-ordinate axes within the 2D texture space while a 3D model has an X, Y, and Z co-ordinates. Having the knowledge and understanding of UV mapping, it now shows that UV mapping helps in the process of texturing an asset (Jarret 2015).

kilapart03_30

Image: https://cdn.tutsplus.com/cg/uploads/2013/07/KilaPart03_30.jpg

Once the UV mapping process is done, texturing takes place. Texturing allows you to control the colors, reflectivity, the shininess, and very much other materials that you desire such as shading (Boudon, 2013). The shader helps give the model a proper, decorative look. A shader is really important to the 3D model because when applied rendering, the model’s surface should reflect or interact with the light (Jarrett, 2015). If the shader is not applied, then the model will look bad and the only thing that remains is the data points. Texturing is usually made as 2D images first before it transforms into a 3D model. After doing so, the 3D model will not be plain looking, but it will look a lot more realistic if the colors and other materials are applied properly. If the 3D character’s textures are done, the process continues as you try to rig the character.

victrolamodeltexture_l

Image: http://www.hulub.ch/images/Portfolio/VictrolaModelTexture_L.jpg

cmsproxyimage

Image: https://cdn.tutsplus.com/cg/uploads/2013/07/KilaPart03_30.jpg


Rigging is a process of adding a “skeleton” or “bones” to the character or a 3D model in order to manipulate its movement whether simple or complex (Erin, 2015). If I want my 3D model to move well, I have to make sure that it will look realistic in a believable manner.

MuscleRig.jpgImage:   http://2.bp.blogspot.com/_KNzYqq1qroQ/TLKGxpIM6sI/AAAAAAAAABU/ykIYu6nwtT8/s1600/MuscleRig.jpg

There are two types of animation: 2D and 3D animation. 2D animation is a frame by frame drawn process worked usually on a paper using pencil or digitally drawn using a tablet or mouse. 3D animation is almost similar to 2D animation, but each movement of the character is captured and positioned in a series to make a smooth animation (Erin, 2015). 3D animation is not drawn, but only digitally modeled to be manipulated in movement. 3D animation exist in a X,Y, and Z world where you can check your model that can be viewed 360 degrees in every angle (“What is the difference between 3D and 2D animation?,” 2010). 3D models can be treated like a real physical object with real physical cameras focusing on the model and real physical lights that shine and reflect upon the object. When I animate a character, I have to position the model in every each frame.

program_animation_top.png

Image: https://animschool.com/images/new/program_animation_top.png

References:

  1. Boudon, G. (2013, November 1). How does a 3D production pipeline work. Retrieved October 7, 2016, from Pluralsight, http://blog.digitaltutors.com/understanding-a-3d-production-pipeline-learning-the-basics/#
  2. Erin, S. (2015, October 27). 3D Modelling Blog. Retrieved October 7, 2016, from Blogspot, http://3dstudentblog.blogspot.ae/2015/10/stages-in-3d-production-pipeline.html
  3. Jarret, L. (2015, June 21). 3D production pipeline – UV mapping, Texturing and Shaders, rigging, animation. Retrieved October 7, 2016, from WordPress, https://lukewjarrett.wordpress.com/2015/06/21/3d-production-pipeline-uv-mapping-texturing-and-shaders-rigging-animation/
  4. Ward, A. (2013, July 30). Game character creation series: Kila chapter 3 – UV mapping. Retrieved October 7, 2016, from https://cgi.tutsplus.com/articles/game-character-creation-series-kila-chapter-3-uv-mapping–cg-26754
  5. What is the difference between 3D and 2D animation? (2010, January 29). Retrieved October 20, 2016, from DBS Interactive, https://www.dbswebsite.com/blog/2010/01/29/what-is-the-difference-between-3d-and-2d-animation/

Production Pipeline: Pre-Production & 3D Modelling

The Production Pipeline is the planning and the preparation of a movie or short animated film that is divided into three steps. As a student learning for 3D animation, I learned that the first step in the 3D animation production pipeline is the pre-production. Pre-production is the most important phase where the projects starts and takes form. It also shows that the project’s main concepts include with a full story, and once the story is finalized, it then includes with a script, a shot sequence, and camera angles.These things are done through story boarding, layouts, models, and animatics (Gulati, 2010). The concepts for style, sets, looks, characters and much more will help in the process of making through the pipeline as people work in their project (Boudon, 2013). Most importantly, the pre-production acts as a reminder of the original plan as people work through their project and their production.

In story boarding, it acts as a blueprint to see how the storyline is developed and how it is visually imagined as it takes through stages for the animation process. The story board is very essential to the project and it usually drawn in a form of a comic strip. I learned that people use story boarding to see how the scene or the ideas can visually be made or animated. Story boarding includes with details of where the action takes place and how it changes in animation along with text notes that also describes the scene itself such as the camera movement (Gulati, 2010). The story board is definitely useful for people working in groups, which is common in most animation industries, and it helps remind the people of their original plan while making the project.

stickfigures

Image: https://accad.osu.edu/womenandtech/Storyboard%20Resource/graphics/stickfigures.jpg

img_3925

In this story board, I tried to use the camera’s view as a bird’s point of view flying over the sky with clouds. When the camera spots a treasure chest, the camera focuses around. While the chest is being focused, the chest starts to shake and then opens to bring forth a ray of light.

When it comes to planning motion or the timing of complicated animation sequences an heavy visual effects, the animatics help provide a plan of how the scene will be staged above sequence, and how the visual effects or VFX will come together with the scene.

After the story boards are approved, it will then be taken for layout to see and designate the location and the costumes for the characters. After doing so, I have to imagine and stage a scene in the layout of the story boards, showing various characters of their position and showing how each course will be shot. In the model sheet process, this is where the characters are designed and drawn to show their possible expressions as well as the poses that the characters can make. This was made to accurately maintain the details of the character as well as to keep the designs of the characters in a way that other different animators can work or make throughout the shot.Once the character design are done, the designs will be sent for modeling to be created as the final character models.

img_3924

My lecturer wants me to model the design in the center choice. The treasure chest is long and has a bit of metal materials as leg support, and top of the chest has a pushed bevel to make it look like material used for underwater.

Once everything is planned for a project to proceed, I use 3DS max to 3D model characters or objects according to my designs and story board plans. 3D modelling is when people create a character, surface or object in a 3D representation by shaping the structure, polygon surfaces, vertices, and edges in an empty 3D geometric space (Slick, 2016).

3ptools_screen01

Image: http://www.3pointstudios.com/3ptools/3ptools_screen01.png

Vertices are the adjustable points on the polygons’ surfaces while the edges are the lines on the polygons that connect the vertices. In 3D modeling, I learned that it is important to know the basics of 3DS max if I want to make a proper 3D model.

img_3926
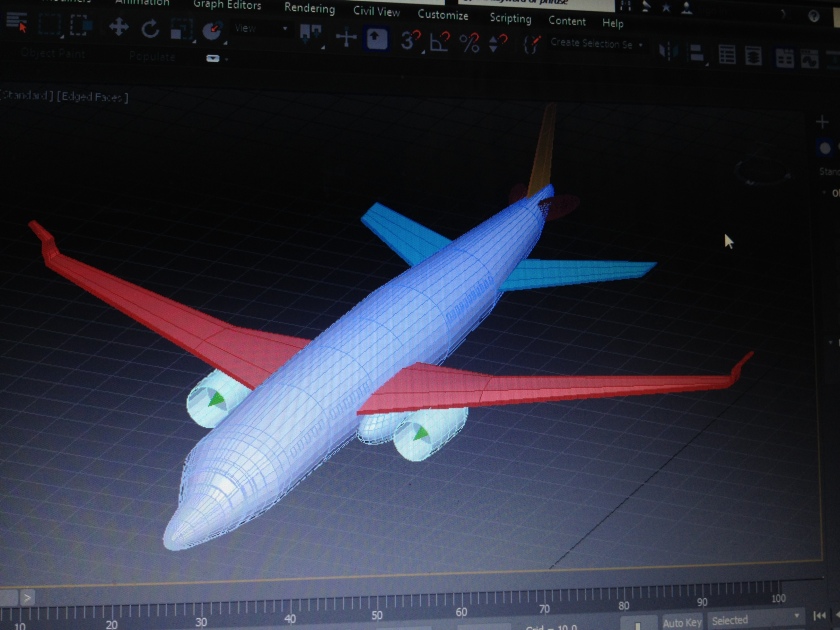
I tried to make my plane look like an air bus, but my mistake was make the nose of the plane longer and pointier, and also making the body a bit fatter and stiff.

References:

3D production pipeline (Pixar vs Dreamworks). (2014, March 26). Retrieved October 6, 2016, from VFX movies UPCOMING, http://www.upcomingvfxmovies.com/2014/03/3d-production-pipeline-pixar-vs-dreamworks/

Boudon, G. (2013, November 1). How does a 3D production pipeline work. Retrieved October 6, 2016, from Pluralsight, http://blog.digitaltutors.com/understanding-a-3d-production-pipeline-learning-the-basics/#

Gulati, P. (2010, June 9). Step-by-step: How to make an animated movie. Retrieved October 6, 2016, from envatotuts+,

Slick, J. (2016, August 23). 3D modeling process defined. Retrieved September 30, 2016, from Lifewire, https://www.lifewire.com/what-is-3d-modeling-2164